Friday, December 31, 2010

Updated To Do List

It's Friday and I checked off the 2 major projects (4 items total) on our to do list:
  1. Pick out a design for my new closet (see below)
  2. Go to Home Depot to buy the closet materials.
  3. Visit Benjamin Moore to buy the paint for this dresser.
  4. If we still go with the oil-based paint (the best option), then I will have to leave the house (go shopping) so my husband can paint it. If we go with water-based paint, then I can paint it while the closet is being built saving us another day, saving us the messy clean-up, and saving me from having to be out of my house due to the smell.
  5. Hang shelves in the dining room (pictures to follow).
  6. Create wedding album from Picaboo. Yes, our wedding was back in July 2009 and we do have a smaller coffee table album, but I've been wanting one of those thick albums with cardboard type pages that lie flat. With a Groupon I received a $100 gift card for only $35. This is the classic wedding album I have envisioned!
  7. Make closet dividers for the baby's closet. I thought about registering for them, but a set includes only 5 dividers and I'd rather attempt to make my own. I plan to follow these directions. I just hope I can find the plastic dividers at AC Moore or Home Depot.
Neither AC Moore, Michaels, or Home Depot sells the plastic closet dividers. The container store does though so that will be a day trip one day since it's about a 40 minute drive from my house. However, there is also a Crate and Barrel store there so shopping will keep me occupied. I could order them, but shipping is almost as much as the item itself plus I love looking at all things organizational!

As mentioned in my previous post, the closet is finished, but I still have some rearranging and reorganizing to do. We also finished the dresser. Well, I should give my husband most of the credit. Although I sanded it and helped primed it, he did most of the painting (and the 2nd coat himself). He really helped out this week and I was very grateful! The dresser looks great in white and I can't wait till we get it into the nursery. I plan to line the shelves with colorful paper (instead of painting them) and will post pictures at a later time. 

I have always been a big "to do" list kind of a person and it brings satisfaction crossing items off on my list. I like being productive. A good way to start 2011. 

Happy New Year!

Thursday, December 30, 2010

My New Closet!

I am loving the outcome of my closet and have started moving my clothes from the nursery. I still have some work on rearranging and organizing, but here are some starter photos!

The completed project:
I bought 2 packages of the velvet hangers in black and gray and plan to switch out the white completely. I love the look of the skinny hangers and it looks much better than the white & I feel they take up less space:
(Bad lighting with my iPhone)
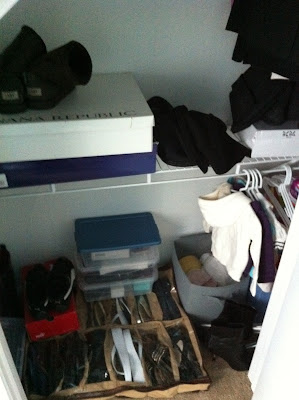
 I also need to find a home for my shoes:
I can now fill the nursery closet with all our baby's adorable clothes, bedding, and accessories until the dresser is dry (we finished painting it this afternoon- another item checked off my list).

Check back for more closet and nursery updates!

Wednesday, December 29, 2010

Closet in Progress

My husband and I were in Home Depot yesterday for quite a while picking out the materials for my new closet. It was pretty stressful. I ended up making some minor revisions in my original design. We bought some materials yesterday, then my husband and his dad went again today to get the rest (with the truck). I sent him to the store with this (and made myself a copy just in case he needed to call and he did once):

Here are some photos of where the closet will be, and the beginning project:
(taken with iPhone so color may be off)
This wall (measuring 94" wide & approx 6 ft high):
 To the right:
 To the left:
 The start of the project:


Loving it so far & I can't wait to see the final project!

Monday, December 27, 2010

My Week Off To-Do List:

My husband and I are off this week for Christmas vacation (an advantage of both being teachers). I had a list for things to get done this week; however, we got our 1st snowstorm yesterday, which left me stranded inside our house. Besides working out, I also caught up on tv shows, emails, etc. I now have 4 days this week to start checking off of my to do list:
  1. Pick out a design for my new closet (see below)
  2. Go to Home Depot to buy the closet materials.
  3. Visit Benjamin Moore to buy the paint for this dresser.
  4. If we still go with the oil-based paint (the best option), then I will have to leave the house (go shopping) so my husband can paint it. If we go with water-based paint, then I can paint it while the closet is being built saving us another day, saving us the messy clean-up, and saving me from having to be out of my house due to the smell.
  5. Hang shelves in the dining room (pictures to follow).
  6. Create wedding album from Picaboo. Yes, our wedding was back in July 2009 and we do have a smaller coffee table album, but I've been wanting one of those thick albums with cardboard type pages that lie flat. With a Groupon I received a $100 gift card for only $35. This is the classic wedding album I have envisioned!
  7. Make closet dividers for the baby's closet. I thought about registering for them, but a set includes only 5 dividers and I'd rather attempt to make my own. I plan to follow these directions. I just hope I can find the plastic dividers at AC Moore or Home Depot.
I currently use the closet in the nursery to store my clothes. My husband has taken over both the closet in our bedroom along with the closet in MY dressing room. I'm not sure how that happened. So, with the baby coming in a few months I decided I wanted to build an open closet in my dressing room using the space that currently holds my 2 Ikea dressers. This will free the closet in the nursery allowing storage space for the baby and her clothes.

I have started to squeeze in my daughter's clothing on the bottom shelf, which makes the closet look very cluttered. Here are some recent photos of my closet:
 What's nice about this closet is that to the left of the photo below is more space to store shoes. :)

I am using these sample designs from Home Depot to select the design for my closet. Here is a sketch of what I'd like my new closet to somewhat look like:

  •  1 long shelf the width of the closet on top
  • 2 poles on the left side to hold tops and pants (shorter length items)
  • 1 pole on the right side to hold dresses, tops, etc
  • Under the dresses I can store an ottoman or small bench 
  • 1 shelf above middle and right side of closet (to hold folded jeans)
  • 3-4 shelves in middle of closet 
  • 3-4 shoe racks below middle shelves
I've decided to go with the wire rack designs for a few reasons. First, it's less expensive than the wood finishes and I want to have the flexibility of changing the design in the future without feeling guilty and without costing me a fortune. Secondly, the wire designs come in a silver chrome, which I like and will match my hot pink dressing room well. Lastly, I actually like the look of the wire better than the wood finish because the overall design looks more open and more spacious. The wood design would make the room look smaller and more compact.
Check back for updates & pictures on the new closet, as well as the other items on my to-do list!


Tuesday, December 21, 2010

Loving these for the Kitchen

I am loving these Ikat mini bowls from Anthropologie. Not only would they look great in the kitchen, but also on a console table or vanity to hold jewelry. I love the khaki color:
I've been looking for a monorgrammed 'Z' mug & haven't found one. I may have to resort to Anthropologie and buy one of these charming mugs:
I love this owl cookie jar. I must have some obsession lately with owls, as I want this owl mug from Pier 1 (posted here):
I've also been looking for a new utensil holder (I currently have a black Oxo one). I want something that will add more color to my kitchen. I am loving this bold blue color:
These wine glasses are elegant and pretty. I love the stenciling on the glass:

Sunday, December 19, 2010

2010 Holiday Decorating

Our tree this year is smaller than last so much that we couldn't even fit all of our ornaments on the tree. I grew up with a (real) tree with ornaments that almost always told a story. Some were made when my siblings and I were young, some were gifts, etc. It was always a family event to decorate the tree. My sister would layer herself with beads for a Christmas picture. My brother would decorate the top branches (he's 6'3"). It was always a fun-filled event. I plan to keep the same tradition for my family. When Nick and I decorated our 1st Christmas tree last year (shown here) I had plenty of ornaments to fill the tree. We start with white lights and layer the tree with ornaments, add red apples, and finish with red bows. Every year since we were young my mom has given my siblings and I an ornament as one of our gifts. I've kept my collection to one day use on my own tree. Last year I bought the same straw ornaments from Ikea my mom has and the red apples at Home Goods. I bought the faux red bows at the Dollar Store. We've also received a few ornaments as gifts. The bride & groom set from my sister in law the Christmas before our wedding. We received a box of of Old World Christmas ornaments for our engagement from my cousin. We also received our blue and cream leopard print monogrammed stockings (Pottery Barn) from her, as well. A perfect gift (if you need an idea for the holidays). I also bought a few silver stars and sparkly balls (hung on our chandelier) from Michael's last year. The only thing missing is a tree topper. I just ordered one from Amazon & hope it will be on our tree in time for Christmas day.


 This one reminds us of our house:

 Ikea straw ornaments:


I picked up a hot pink mini sequined stocking from Target for our baby girl. Next year she'll get a bigger one, but this will do for now since she's not technically here yet. :) I bought more sparkly ornament balls from both Target and the Dollar Store (each package of 6 were only $1) in silver and purple. The purple were from the Dollar Store. I filled apothecary jars and tall vases with them for a festive look. The silver and purple were placed in our front room to match the color theme of the room. A jar of the silver were placed on our black cabinet in our dining room.


 Colored ornaments at Target for only $1!

Close-ups:


Pottery Barn silver frosted pine cones in a square glass vase on our mantel:
 Santa Claus bowl filled with $1 mints from Target (yummy, too):

Putting it all together:


I love this $7 star mirrored ornament from TJ Maxx. I saw the exact same one at a floral boutique priced at $23, and a bigger one for $56! I decided to stand it by itself instead of hanging on the tree:

Greens on top of the bar with pine cones & berries:
 Also, along the banister using more of the $ store red bows:

Happy Holidays!

Wednesday, December 15, 2010

Creative Cards Display

During the holidays we get a lot of cards. Last year we displayed them on our bar as shown here and this year we made space on our wooden island in our kitchen. All of our picture cards are posted on our fridge. These usually stay for the remainder of the year (sometimes longer). The kids are too cute to remove. :) Below are some other, and more creative, ideas for displaying all of your holiday cards.

Frame display:
  • This one is from Pottery Barn. I would recommend attempting to do this yourself instead of buying it for $150. You can buy a picture frame, remove the glass, and attach wire connecting each side. Use clothespins or mini clips to hold the cards to the wire: 
  • Repurpose a frame into a corkboard and use it pin holiday cards: 
  • Or, decorate on a easy diy wreath:
  • Attach a string or pretty ribbon above a doorway, on an island, a bookshelf, even your banister to attach cards in an easy and very inexpensive way. 
  • You can also forgo the string and attach the cards to the doorway themselves using a removable adhesive and garland:
  • Clip branches from your tree and arrange in a tall vase. Attach cards to the branches by using a hole punch and looping a ribbon through the hole. Place on a console table or use as a centerpiece: 
  • Slip cards (open or closed) under a glass table top:
    Enjoy an organized holiday card arrangement!